Introduction: Chia pudding, with its delightful texture and health benefits, has become a popular choice for breakfasts, snacks, or even desserts. Packed with omega-3 fatty acids, fiber, and various nutrients, chia pudding is not only delicious but also a nutritious addition to your diet. In this comprehensive guide, we will explore the step-by-step process of making the perfect chia pudding, along with creative variations to suit your taste buds.
Ingredients:
- Chia Seeds (1/4 cup): The star ingredient that gives the pudding its unique texture and nutritional profile.
- Milk of Your Choice (1 cup): Almond milk, coconut milk, soy milk, or dairy milk – choose according to your preference.
- Sweetener (1-2 tablespoons): Maple syrup, honey, agave nectar, or any sweetener of your choice.
- Vanilla Extract (1 teaspoon): Enhances the flavor profile of the pudding.
- Optional Toppings: Fresh fruits, nuts, seeds, or granola for added texture and flavor.
Equipment:
- Mixing Bowl: Combine and whisk the ingredients.
- Whisk or Spoon: For stirring and ensuring even distribution of chia seeds.
- Airtight Container or Jars: Let the pudding set in the refrigerator.
Step-by-Step Instructions:
Step 1: Gather Your Ingredients Assemble all the necessary ingredients and equipment on your kitchen counter. Having everything ready will streamline the process.
Step 2: Combine Chia Seeds and Liquid. In a mixing bowl, combine chia seeds and the milk of your choice. Stir well to prevent clumping. Ensure that the chia seeds are evenly distributed throughout the mixture.
Step 3: Add Sweetener and Flavoring. Pour in the sweetener (maple syrup, honey, or agave nectar) and add vanilla extract. Stir the mixture again to incorporate the sweetener and flavor evenly.
Step 4: Let It Sit. Allow the chia seed mixture to sit for 5 minutes, stirring occasionally. This will prevent clumping and ensure a smooth consistency.
Step 5: Stir Again Before Refrigeration Before placing the mixture in the refrigerator, give it a final stir. This step is crucial for achieving a pudding with a consistent texture.
Step 6: Refrigerate for at Least 2 Hours or Overnight. Transfer the mixture into airtight containers or jars and refrigerate for a minimum of 2 hours or, preferably, overnight. This gives the chia seeds ample time to absorb the liquid and create a pudding-like consistency.
Step 7: Check and Adjust Consistency After the chilling period, check the pudding’s consistency. If it’s too thick, you can add a bit more milk and stir until it reaches your desired thickness.
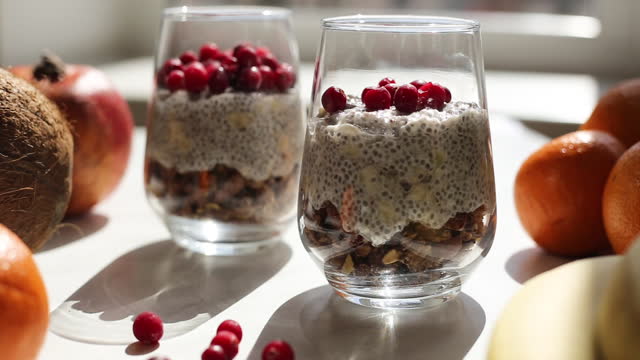
Step 8: Serve and Enjoy. Spoon the chilled chia pudding into bowls or glasses. Top it with your favorite fruits, nuts, seeds, or granola for added flavor and texture. Your homemade chia pudding is now ready to be savored!
Creative Variations:
- Chocolate Chia Pudding: Add cocoa powder to the mixture before refrigerating for a delicious chocolate twist.
- Berry Bliss: Layer the pudding with fresh berries or mix them into the chia seed mixture for a burst of fruity goodness.
- Matcha Marvel: Incorporate matcha powder into the mix for a trendy and flavorful green tea-infused pudding.
Conclusion: Making chia pudding is not only easy but also allows for endless creativity in flavor combinations. Whether enjoyed for breakfast, as a snack, or dessert, your homemade chia pudding is sure to be a hit. Experiment with different ingredients, toppings, and variations to find your perfect chia pudding recipe. With this comprehensive guide, you’re well-equipped to embark on your chia pudding-making journey. Enjoy the delicious and nutritious results!


